Porous materials, like drywall, act like a sponge as water wicks up the walls. Moisture becomes bound within the materials, including wall cavities.
Baseboards and paint can act as a vapor barrier and slow drying. Airflow and dehumidification are necessary components of water restoration. Without airflow inside a wall cavity, vapor pressure builds up, preventing effective drying. The best way to promote airflow is through wall cavity drying. Wall cavity drying helps reduce the overall drying time of affected materials by speeding up evaporation.
By creating a hole in between each stud bay, the vapor pressure decreases, allowing the trapped moisture to wick out and evaporate into the drying chamber. (Capillary Action is the process of moisture pulling through the pores of affected materials and then evaporating.) Vapor diffusion occurs when water molecules move through a surface due to differences in vapor pressure. Vapor diffusion typically moves from high to low pressure.
With proper airflow and dehumidification, drying can now occur within the wall cavity.
When water damage occurs, it is often necessary to restore the affected areas to their pre-loss condition. Restoration efforts typically involve removing damaged materials, drying out the affected areas, and repairing any structural damage that has occurred. However, in the process of restoration, it’s important to avoid excessive demolition.
Excessive demolition refers to the unnecessary removal of building materials that are still structurally sound. This can happen when the restoration team is overly aggressive in their efforts to remove damaged materials or when they are not properly trained to identify materials that can be salvaged. Excessive demolition can result in unnecessary expenses, a longer restoration process, and a more significant disruption to the property owner’s life or business.
To avoid excessive demolition during water restoration, it’s essential to work with a reputable restoration company that has experience in dealing with water damage. The company should have a clear understanding of what materials can be salvaged and what materials need to be removed. They should also have the necessary equipment and expertise to dry out the affected areas quickly and effectively.
It’s important to remember that not all materials need to be removed after water damage occurs. For example, drywall can often be dried out and salvaged, as long as it has not been exposed to water for an extended period. Wood framing can also be salvaged if it has not begun to rot. By identifying materials that can be saved, the restoration team can avoid excessive demolition and minimize the disruption.
Another way to avoid excessive demolition during water restoration is to take a proactive approach to maintenance. Regular inspections and maintenance can help identify potential problem areas before they become significant issues. For example, if a leaky pipe is identified and repaired promptly, the water damage can be minimized, and the need for extensive restoration can be avoided.
In conclusion, excessive demolition during water restoration can be costly and disruptive. To avoid this, it’s essential to work with a reputable restoration company that has experience in dealing with water damage. The restoration team should have a clear understanding of what materials can be salvaged and what materials need to be removed. Additionally, taking a proactive approach to maintenance can help identify potential problem areas before they become significant issues. By following these tips, property owners can minimize the disruption caused by water damage and restore their properties quickly and efficiently.
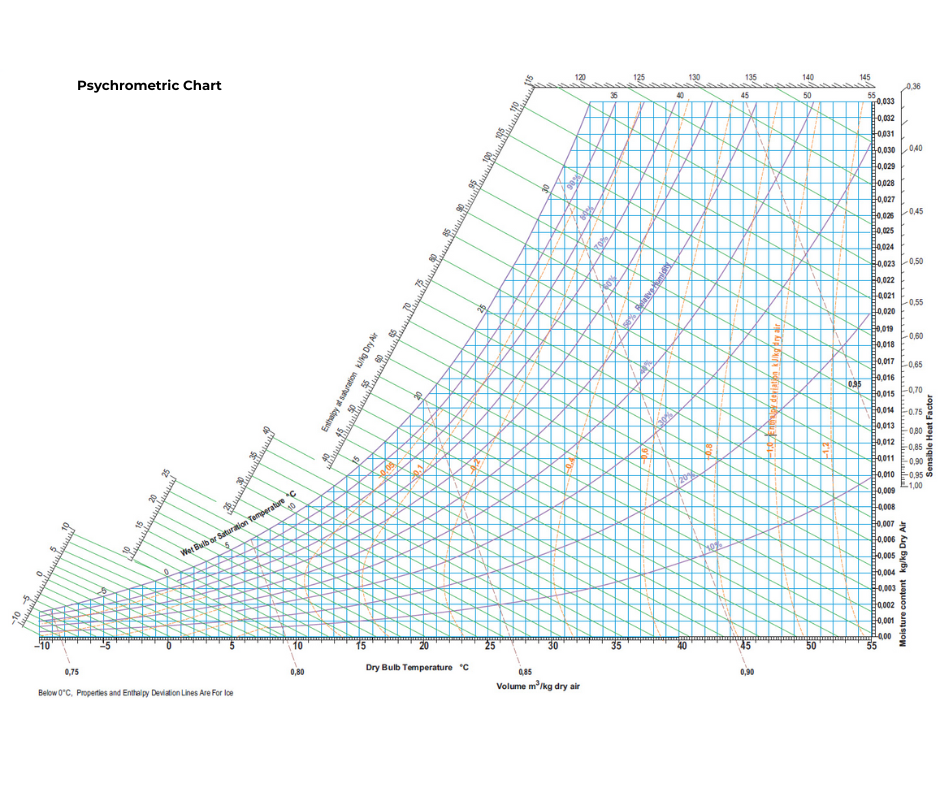
Psychrometry is a critical aspect of water restoration, and it is essential for water restoration professionals to understand it. Psychrometry is the study of the properties of air and water vapor, and it is essential to know when drying out a wet structure. When a structure has been damaged by water, it is important to know the humidity and temperature of the air, the amount of moisture in the air, and the amount of moisture in the materials within the structure. This information is critical to determine the best way to dry out the structure effectively.
The psychrometric chart is a tool that helps water restoration professionals determine the properties of air and water vapor. It is a graph that shows the relationship between air temperature, humidity, and moisture content. Using the psychrometric chart, restoration professionals can determine the dew point, wet bulb temperature, and other important parameters.
One of the most critical factors in psychrometry is relative humidity. Relative humidity (RH) is the amount of moisture in the air compared to the maximum amount of moisture that the air can hold at a given temperature. RH is expressed as a percentage, and it is critical to maintaining the proper RH level during the drying process. If the relative humidity is too high, the air will be saturated, and moisture will not be able to evaporate from wet materials. On the other hand, if the relative humidity is too low, the drying process will be slow and inefficient.
Another important factor in psychrometry is the specific humidity. Specific humidity is the actual amount of moisture in the air. It is measured in grains of moisture per pound of dry air. Knowing the specific humidity is essential for calculating the amount of moisture that needs to be removed from the structure to achieve the desired level of dryness.
The final factor to consider is temperature. The temperature of the air and materials within the structure will affect the rate of evaporation. The higher the temperature, the faster the drying process will be, but it is important to monitor the temperature to prevent damage to the structure and to ensure safety.
In conclusion, psychrometry is a critical aspect of water restoration, and it is essential for water restoration professionals to understand it. The psychrometric chart is a valuable tool that helps determine the properties of air and water vapor, and relative humidity, specific humidity, and temperature are all critical factors in the drying process. Proper monitoring and understanding of these factors will help ensure an efficient and effective drying process, leading to a successful water restoration job.
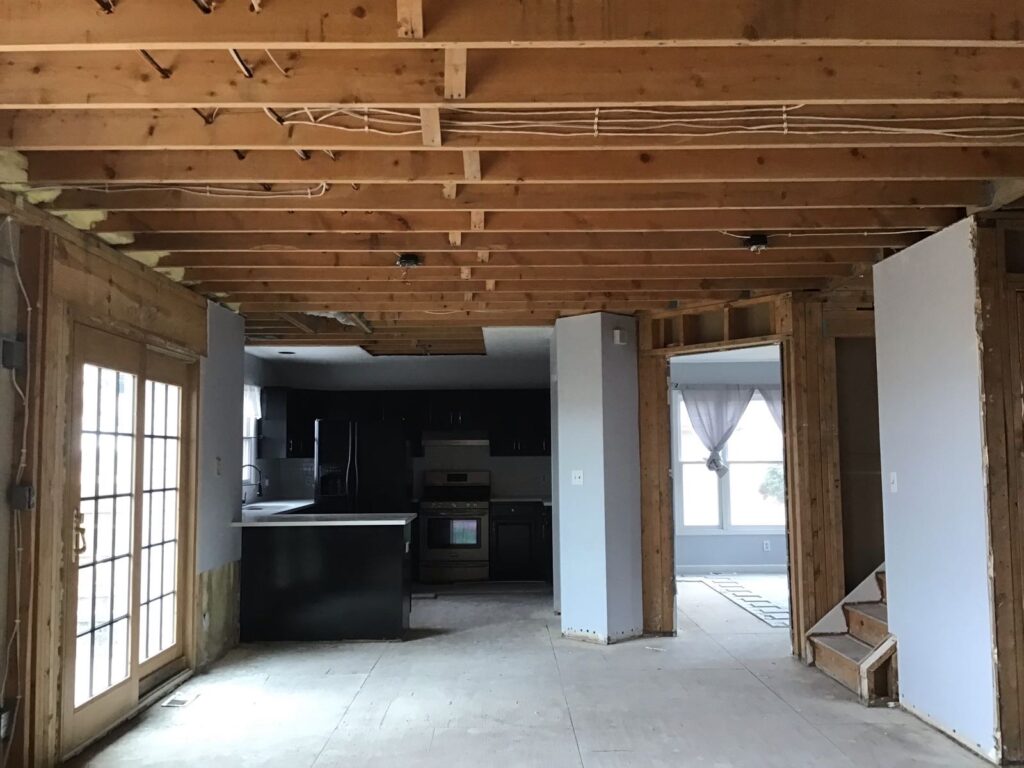
Water damage can be a nightmare for homeowners and business owners alike, and one of the most challenging aspects of water restoration is drying out wall cavities. When water seeps into walls, it can cause mold growth, structural damage, and unpleasant odors. That’s why it’s crucial to ensure that wall cavities are dried thoroughly and efficiently. In this blog post, we’ll discuss wall cavity drying and provide water restoration professionals with some essential tips for achieving successful drying outcomes.
A wall cavity is a space between the exterior and interior walls of a building. This space usually contains insulation, electrical wiring, plumbing, and other elements that can be damaged by water intrusion. When water enters the wall cavity, it can take a long time to evaporate due to the lack of airflow and sunlight, making it challenging to dry out effectively.
One of the most effective methods for drying wall cavities is using specialized drying equipment. This equipment includes dehumidifiers, air movers, moisture meters, and infrared cameras. Dehumidifiers extract moisture from the air, reducing the relative humidity in the affected area, while air movers increase airflow and promote evaporation. Infrared cameras can detect areas of moisture in walls, allowing restoration professionals to target these areas specifically.
It’s also important to remember that drying out wall cavities can be a time-consuming process, and it’s essential to monitor the drying progress regularly. Restoration professionals should use moisture meters to check the moisture levels in the affected area regularly. Moisture levels should be checked in both the affected area and adjacent areas to ensure that the moisture hasn’t spread beyond the affected area.
In addition to drying out wall cavities, it’s also crucial to address any underlying issues that led to the water damage in the first place. If the water damage was caused by a leak or a broken pipe, the source of the water must be fixed before restoration can begin. Failing to address the underlying issue can lead to recurring water damage and costly repairs in the future.
In conclusion, wall cavity drying is a critical component of the water restoration process, and it’s essential for restoration professionals to approach it with care and attention to detail. By using specialized drying equipment, ensuring proper ventilation, monitoring progress regularly, and addressing any underlying issues, restoration professionals can achieve successful drying outcomes and prevent further damage to the affected area.
Drying water-damaged walls is a crucial step in the restoration process. However, it can be a complicated process that involves several stages. Fortunately, there are different ways to dry walls, depending on the severity of the damage.
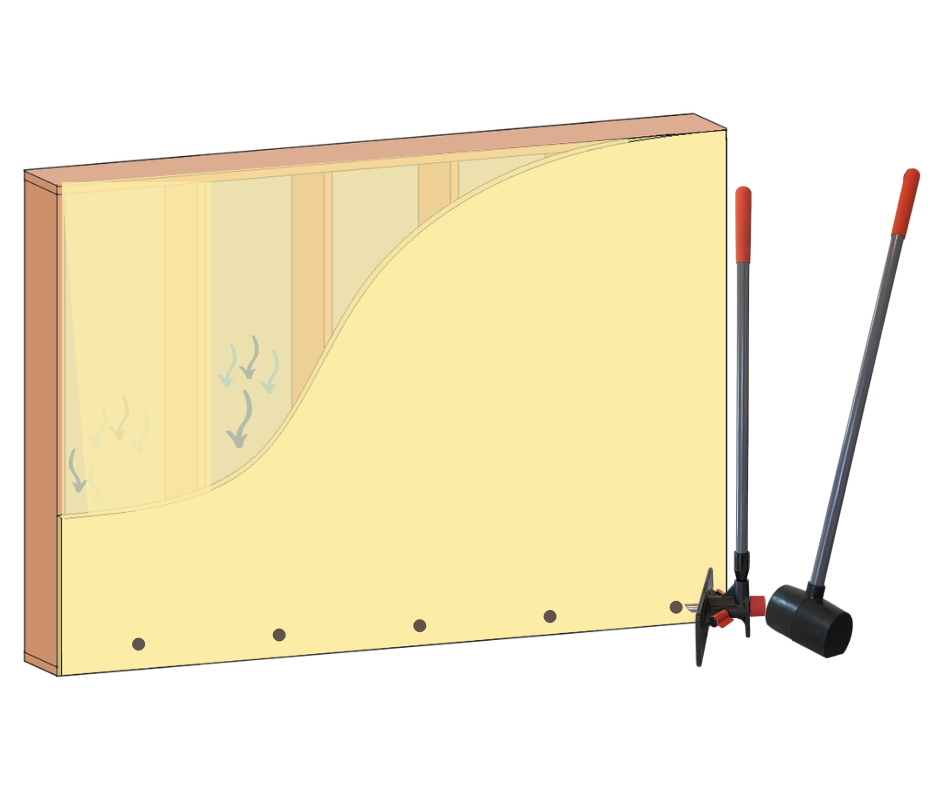
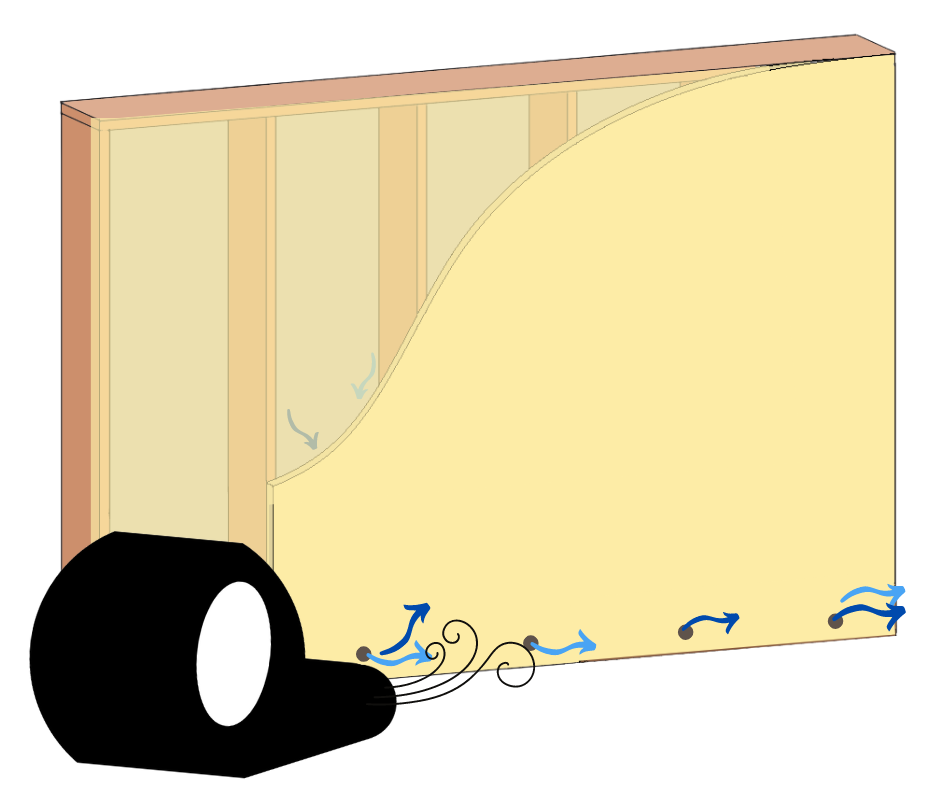
Firstly, let’s discuss the importance of wall cavity drying. Wall cavity drying is a process that allows airflow to access the affected wall cavities by creating holes in the drywall. This process is especially useful for the second and third stages of drying, drying through capillary action and vapor diffusion. By removing the baseboard and creating one 5/8″ hole every 14-16 inches, moisture trapped inside the materials can turn into vapor and evaporate into the drying chamber. Wall cavity drying can help reduce the overall dry time of affected materials.
When should you use wall cavity drying methods? There are several general guidelines to follow. Wall cavity drying is useful to achieve the standard drying time of 3-5 days, to decrease demolition such as “flood-cutting,” to dry rooms without direct air circulation, to dry hard-to-reach spaces, and in conjunction with specialty cavity drying systems and equipment. However, it is important to assess each situation and choose the best tool for the job.
Four pro tips for wall cavity drying.
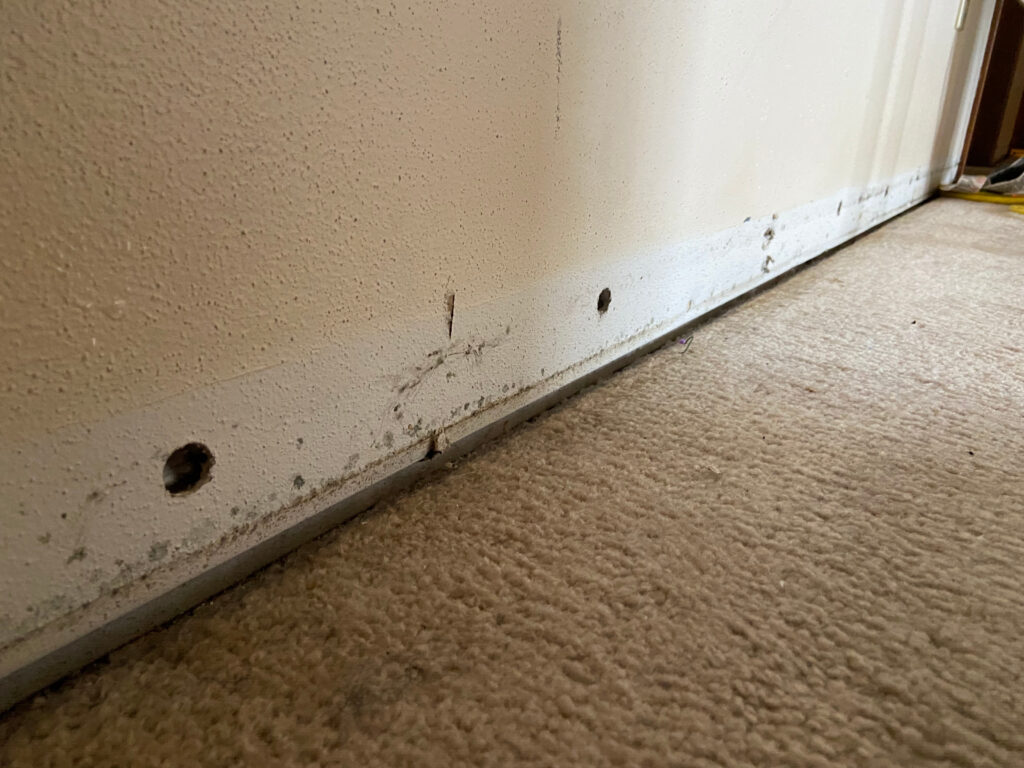
Firstly, removing the baseboard allows capillary action to occur, and bound moisture in the walls may wick out through the bottom of the walls. To reduce secondary damage to affected walls, carefully score the top of the baseboard to disconnect it from the wall or wall covering.
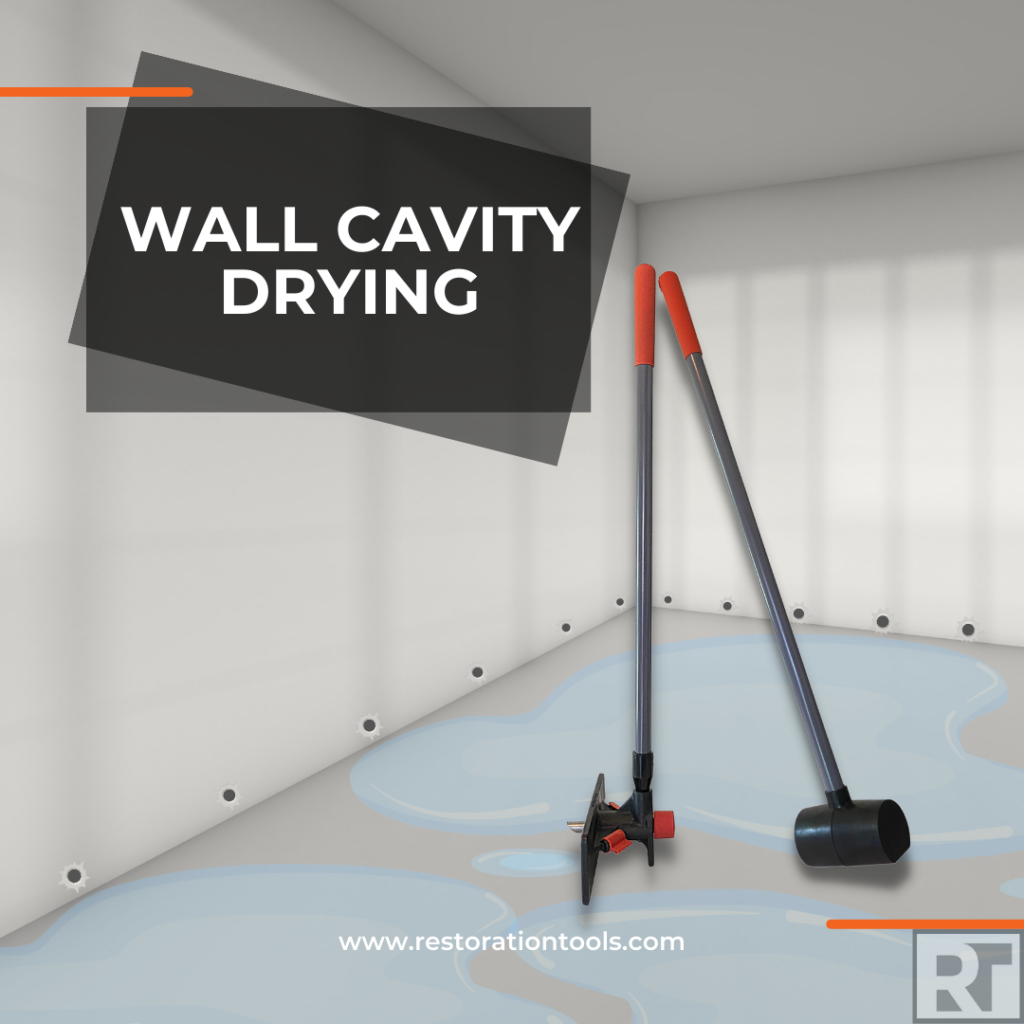
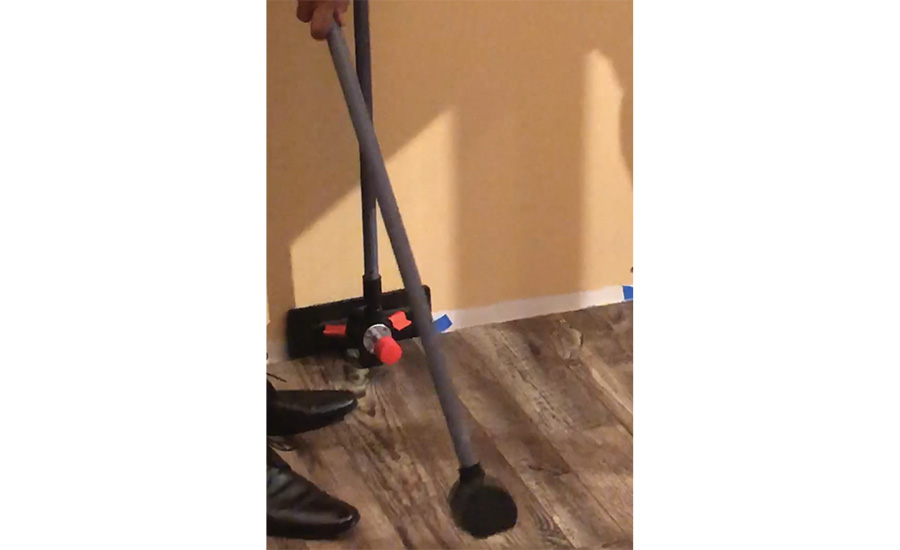
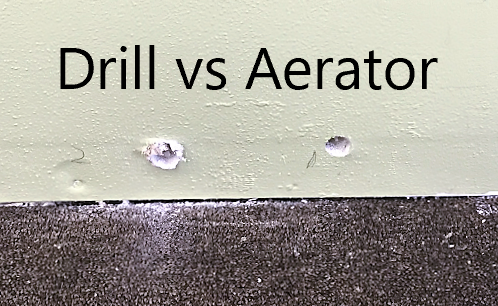
Secondly, an aerator can be used to create the necessary holes in the drywall. Restoration Tools has developed an innovative tool called the Aerator that speeds up this process by 15 times.
Thirdly, it is important to consider potential contaminants during inspection for the proper safety and health of customers and technicians. (Cat 1, 2, or 3)
Lastly, be sure to follow the EPA’s Lead RRP procedures when doing demolition in a building built before 1978. Older buildings may have lead paint or asbestos, and it is imperative that safe abatement procedures are followed.
In conclusion, drying water-damaged walls is a complicated process that involves different stages. Wall cavity drying is an effective method to achieve the standard drying time of 3-5 days, decrease demolition, and dry hard-to-reach spaces. It is essential to assess each situation and choose the best tool for the job. Remember to consider potential contaminants and follow proper safety procedures during the restoration process. Restoration Tools’ Aerator is an innovative tool that can speed up the process of creating necessary holes in the drywall by 15 times.
Watch the video below to see the process of Wall Cavity Drying.
As a Restoration Professional, you are aware that water damage restoration is a complex process that involves many different factors. One of the most important of these factors is the concept of enthalpy.
Enthalpy is a thermodynamic property that describes the total energy of a system, including both its internal energy and the energy required to move it from one location to another. In the context of water damage restoration, enthalpy plays a critical role in understanding the behavior of moisture and humidity in the environment.
When water damage occurs, it is not only the standing water that needs to be removed but also the excess moisture in the air and building materials. This moisture can cause secondary damage such as mold growth and deterioration of structural materials. Therefore, it is crucial to control the temperature and humidity levels in the affected space to prevent further damage.
Enthalpy is particularly relevant in this process because it helps us understand how much energy is required to remove moisture from a given space. This is important because different materials have different moisture content and require different amounts of energy to dry effectively. For example, a plaster wall will require more energy to dry than a drywall surface because it has a higher moisture content.
In the water restoration process, we use tools such as dehumidifiers and air movers to control the temperature and humidity levels in the affected space. The goal is to lower the enthalpy of the air in the space, making it easier to remove the excess moisture. This process requires a delicate balance between temperature, humidity, and air movement to ensure that the environment is optimal for effective drying.
It’s important to note that the use of enthalpy is not a one-size-fits-all solution in water damage restoration. Every situation is unique and requires a customized approach to ensure effective drying. This is why it’s important for restoration professionals to gain the experience and knowledge to assess each situation and develop a tailored plan of action.
In conclusion, enthalpy is a critical factor in the water damage restoration process. By understanding how it relates to moisture and humidity, restoration professionals can develop effective drying strategies that minimize damage and ensure a successful restoration.
There are multiple ways to dry affected walls, each with different benefits depending on the severity of the loss. It is often recommended to start with the drying process that requires the least amount of demolition. When you remove affected materials that could be dried, you decrease the amount of drying equipment needed. Drying walls allows you to minimize your labor costs while maximizing the amount of drying equipment on a job.
1. A common step to drying affected walls is to remove affected baseboard. By detaching baseboard from wet walls, capillary action (stage 2 of the drying process) can occur. While baseboards may impede the dry-time of wet walls, this is also the case with wall coverings such as calcimine (often referred to as “cal-cote”), gloss and semi-gloss paints, and wallpaper. Once the baseboard is removed, and nearby flooring is dry, bound moisture in the walls may “wick” out through the bottom of the walls. Contractors often leave a small gap between the wall material and the subfloor.
Pro Tip#1: To reduce secondary damage to affected walls, carefully score the top of the baseboard to disconnect it from the wall or wall covering.
2. When materials become wet, the moisture becomes bound within the materials, including the inside of wall cavities. To dry materials that contain bound water, the drying process goes through the third and final stage of drying, “vapor diffusion”. The best way to allow airflow to access the affected wall cavities is through wall cavity drying. By removing the baseboard and creating one 5/8” hole every 14-16 inches (or in between each stud bay), the decrease in vapor pressure will allow moisture trapped inside the materials to turn into vapor and evaporate into the drying chamber. Wall cavity drying can help reduce the overall dry-time of affected materials.
Pro Tip #2: Use an aerator, like the one created for restorers by Restoration Tools, to create the holes for wall cavity drying. It is 15 times faster than the current method and leaves no debris to clean up.
Pro Tip #3: The process of creating holes for wall cavity drying can typically be added to estimates. (ex: Xactimate users, use WTR WALLH)
3. In some cases, the process of wall cavity drying may require the use of specialty drying equipment. Unlike typical wall cavity drying, where the vapor evaporates into the drying chamber through the cavity hole, the injected airflow helps to inject drier air from the chamber into the cavities.
Aerator being used to make holes for wall cavity drying.
Pro Tip #4: Using injected-air drying systems can be advantageous in drying hard-to-reach spaces or sensitive areas such as server/computer rooms.
As with any water loss, it is necessary to utilize proper drying equipment sized and placed to allow for optimum drying. Follow local and industry guidelines in determining salvageable materials and the best drying process for each water loss.
Be sure to follow the EPA’s lead RRP procedures when doing demolition in a building built before 1978. Older buildings may have lead paint or asbestos, and it is imperative that safe abatement procedures are followed.
Wall cavity drying. It’s a simple concept, but what does it do for the drying process and why is it so important?
We know the drying process consists of three stages:
Removal of surface water through evaporation – using airflow of warmer drier air to evaporate moisture as it wicks from the material pores.
Removal of free water through capillary action – as long as surface tension is decreased and the material pores are still wet, water will continue to be pulled from the affected materials and then evaporate. Baseboard is a common inhibitor to the capillary action, so it is commonly detached.
Removal of bound water through vapor diffusion – capillary action can no longer continue, forcing the moisture to turn into vapor and evaporates from inside the pores. The third stage of the drying process is the most difficult to achieve in materials that do not have full airflow on all sides of the affected materials.
Wall cavity drying is especially useful for the second and third stages (drying through capillary action and vapor diffusion). Let’s take wet walls of drywall as an example. After removing the baseboard, which blocks air flow, technicians may create ⅝” holes along the perimeter of the affected walls. Through a combination of the pressure exerted, the volume of the space, and the latent energy, water is taken from its physical state and turned into a gas, or vapor. This process can also take place in ceiling and cabinet cavities.
So when should you use wall cavity drying methods? Here are some general guidelines:
to help achieve the standard drying time of 3-5 days
decrease demolition, such as “flood-cutting”. While gypsum board loses structural integrity when wet, the strength returns as it dries, allowing for salvageability.
Category 1 and Category 2 losses – be sure to consider all potential contaminants during inspection for proper safety and health of customers and technicians.
to dry rooms without direct air circulation (such as server/computer rooms)
to dry hard to reach spaces through the backside of an adjoining room
to dry under cabinets and vanities
in conjunction with specialty cavity drying systems and equipment
There isn’t a “one size fits all” method for water restoration, as each job and customer is unique. It is important to assess each situation so you can use the best tool for the job. After removing the baseboard, being sure to score it so as to not cause secondary damage, the most common method of creating holes for wall cavity drying is with a drill and vacuum. Did you know you can typically add this as a line item in your estimates? A fact of the restoration industry is the high margin profitability of equipment rental, and conversely, the low margins associated with labor intensive tasks. When you remove affected materials that could have been dried, you decrease the amount of drying equipment needed. Drying wall cavities allows you to minimize your labor costs while maximizing the amount of drying equipment on a job.
A new tool has emerged in the market, called the Aerator, that speeds this process by 15 times. This innovative tool is designed and produced by Restoration Tools. The team has over 40 years of combined experience in the disaster restoration industry and is improving restoration one tool at a time. To learn more about the Aerator and Restoration Tools, visit restorationtools.com.
Be sure to follow the EPA’s Lead RRP procedures when doing demolition in a building built before 1978. Older buildings may have lead paint or asbestos, and it is imperative that safe abatement procedures are followed.
Tool helps workers accomplish tasks in record time
Jocelyn Hare, Restoration Tools’ chief operations officer, displays a newly developed tool proving to be a game changer for the disaster restoration industry.
“Necessity is the mother of invention”. This proverb has been the driving force for Restoration Tools, a company that is developing industry-changing tools for disaster restoration. While the team was doing its work as members of a disaster restoration franchise, the realized the need in their industry for more innovative tools which allowed workers to complete tasks faster and more safely.
Product Development
With more than 40 years of combined experience in the disaster restoration industry, Restoration Tools partners are familiar with what it takes to run a restoration company. Designing and producing a new product was a totally new ballgame.
Inventing and manufacturing a product always presents unforeseen challenges. Identifying challenges, creating new solutions and overcoming roadblocks is part of the process of product development. Restoration Tools has a lot of ideas, and the initial impulse was to try to develop them all at once. With the guidance of NIU EIGERlab’s Center for Product Development, they decided to tackle one invention at a time.
After settling on their first product, The Aerator, they soon realized they had a multitude of decisions to make. In order to achieve the best results, and not damage their new product, they realized it must be paired with a custom mallet for best results.
With more than one product element to be managed, the team decided to offer a custom carrying bag so the equipment would not be lost or left behind on the job site.
Another caveat to their current innovation underway is offering customer coloring for larger-sized clients such as franchise owners, to provide brand consistency for the company.
The Restoration Tools team discovered that product development is a complex challenge and that when starting a new entity, you may need more time and capital than you initially forecasted.
“We’ve now participated in our first trade show and advertised in our first trade magazine,” said Jocelyn Hare, chief operations officer. “People see the need [for The Aerator], and we’re elated to share that partnerships are forming. In addition, we have reconsidered our sales model to work alongside distributors who will not only assist with sales, but will enhances our marketing efforts.”
Accelerated Growth
The Aerator is a powerful tool because it allows a project that would have taken a technician an hour to complete, to be handled in just five minutes. As such a game changer for the disaster restoration business, it’s already in high-demand.
“From our test marketing, we knew the product had legs, but surprisingly, not to this level. Currently, we’re handling the assembly internally, but we anticipate the need to expand more quickly than we originally thought,” Hare said.
Being an owner of a restoration company for the last 14 years, the process of drilling holes has always been a headache. When you hire technicians, it is inevitable that at some point, they drill a hole above the baseboard, which creates extra work and lost revenue. Not only does The Aerator totally eliminate that issue, but it also saves so much time and effort with the process and cleanup itself.
– Bill K
A local business owner recently bought two Aerators and is planning to purchase another three this month, due to increased productivity and rave reviews from employees.
The Aerator is just the beginning for Restoration Tools. “Now that we have experience creating our first product, we plan to move on with additional inventions quickly. We anticipate starting the R&D phase of our next product in late 2019,” Hare said.
NIU EIGERlab embraces startups and supports entrepreneurs like the Restoration Tools team along the pathway toward success. Programming and services are in place at two NIU EIGERlab locations to assist startups and existing businesses—entrepreneurs in all phases. To learn more about how NIU EIGERlab can help you develop your idea or grow your business, visit www.EIGERlab.org or call 815.753.2192.